
It was 1965. Yves St Laurent was close to finishing his Autumn collection when he encountered the work of Piet Mondrian. YSL was so inspired by the patterns – different sized and shaped blocks, mostly white, but occasionally primary red, blue or yellow, divided by solid black lines – that he scrapped a chunk of his nearly completed work to replace them with six Mondrian inspired dresses.

These dartless, collarless, and (usually) sleeveless shift dresses feature Mondrian-style color blocking. The version that appeared on the cover of Vogue magazine has become the icon dress of the mod, swinging sixties. Many sewists, and women of a certain age who remember that era, are also familiar with the version released as a sewing pattern by Vogue patterns in the 1960s.
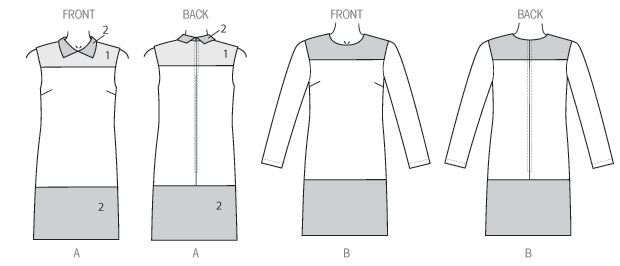
Fifty years later Vogue issued a “re-release” of their Mondrian dress, except it wasn’t. It was a hack of a current pattern (9048), a darted shift with a yoke and wide band, with instructions on how to convert the pattern to the color blocking from the original Vogue release. Except this version still has the darts.
Not all six dresses were dramatic walking works of art. The least Mondrian-ish is a shift with a contrasting yoke and long, cuffed sleeves.

My Mondrian dress is for a 1960s murder mystery evening. If I finish it in time, I might also wear it to the sewing expo.
A Great British Sewing Bee challenge featured Mondrian style dresses. A pattern for a dartless version is included in their book From Stitch To Style.
I decided to go with V9048 because I will need fitting adjustments, and it’s just easier to do that with a dart. I’m doing my own design hack. I’m adding narrow bands of black, adding short sleeves, using a 3-part design, and bringing part of the design around to the back. I don’t want the back to look like it belongs on a plain, simple dress, but got lost and ended up behind a colorful Mondrian front.
My color scheme is blue, red and green. Yellow is not my friend, and I don’t have any yellow in my stash. The blue and green are 100% poly activewear knit from my stash. The red is a textured 100% poly double knit, used inside out so the smooth interior surface is visible. The black bands are 100% poly double knit, and the base dress is rayon/lycra ponte lined with daisy white poly/lycra ITY knit.
I will make an elbow length sleeve, white on top, green band on the bottom, with a narrow black band in between.
Because my materials are stretchy and this design does not have a fitted waist, I think I can eliminate the back zipper. If things go badly wrong I can always add a side zip.
The Pattern
I always need a full bust/waist adjustment. Most Vogue patterns are not drafted for my body type, so the fba is often just the starting point. For this dress, I do the fba and extend it down to the hem, omitting waist darts and keeping the shape as simple as possible.
I’m going to be literally hacking this pattern apart, so I start by tracing the darted middle section. I add the fba to the tracing, then trace that bodice half again, so I have a left and right piece (one side is the altered tracing, the other is a copy of the altered tracing). I tape the pieces together along the centerline, giving me one large pattern piece. I picked a spot about 2/3 of the way across the piece, and sliced it there from top to bottom, creating the asymmetrical left and right middle pieces.
The front yoke is supposed to be positioned on a fold at the center front. I’ll skip the fold, and add a seam allowance instead. This should put a seam directly in the center front.
I trace the sleeve pattern piece, shortening it to about elbow length.
Fitting the Lining
I used the lining to test for fitting and placement of the stripes and blocks. I cut a yoke back, two yoke fronts (because I’m adding a Center Front Seam) and both middle front pieces. For the middle back, I boldly eliminated the Center Back Seam and cut the piece with the centerline positioned on a fold.
I sewed the darts first, then the middle front sections, then the CFS in the front yoke. I sewed the front yoke to the assembled middle front, the back yoke to the middle back, and front and back yokes together at the shoulders. Last step was sewing the side seams. I used a narrow zig zag stitch.
One of the pins marking a dart fell out during construction, so one of the darts came out wrong on the first try. I also felt the armhole was a little bit big, and the bust points sat a bit low. I fixed this by cutting 1″ off the top of the front and back middle sections. This reduced the size of the armhole and raised the bust points up to the right place. The middle back section also came out a bit short, so I added an extra band to bring it to the correct length. The sample sleeve fit in the armhole and was a good length.
I cut one sample sleeve from lining material, sewed it up, and inserted it into an armhole. It looked good.
I decided I wanted the seam line between yoke and middle section to be the top edge of the black horizontal band. I also decided the vertical seam line dividing the front section would be one edge of the vertical black band.

Back to the Pattern
Now I had to transfer my changes back to my pattern, adapt the altered pieces to fit the black bands, and create the pattern pieces for the bands.
I cut 1″ of the top of the right and left front middle section and and back middle section to match the alteration I made to the lining. I added the extra needed length to the back middle piece.
I want the black bands to have a finished width of 2″. The bands will need a 5/8 seam allowance on each side, so that’s 1-1/4. So each pattern piece needs to be 3-1/4″ wide.
To create the short vertical center band and adapt the yoke pieces I cut 1″ off the center of the right and left front yokes. I’ve already added a s/a to sew the lining pieces together, so that covers the s/a on the yoke side. For the band piece, I cut a rectangle 3-1/4″ wide and 6″ long. The center of the yoke is roughly 5 -5/8, so I align one short edge of the pattern piece along the bottom of the yoke, shaping the top of the to match the neckline.
The horizontal yoke/middle section seam is in the right place for the top edge of the black band, so I don’t need to do anything else to the yoke pattern. There’s already a s/a at the top of the middle sections, so I don’t need to add to worry about that. I just need to compensate for the finished width of the black band by cutting the top 2″ of both front pieces. The problem is, this depth runs into the armhole. It could be a real problem later on. I add a s/a to both long sides of the band to make the pattern piece.
Next the middle sections need to be adjusted for the wide vertical band. The s/a on both side pieces is already there, so again no worries. I just need to remove the 2″ width of the finished band. I do this by taking 1″ off the center front of each side piece.
Finally I cut a second horizontal band that will go all the way around front and back, the thick green band for the very bottom of the dress (that pattern piece was fine, and required no alteration), and a thin band to separate the back yoke from the back middle section.
I’ll worry about the sleeves later.

On to the Fabric
Blue: Right front yoke, back yoke. Polyester athletic knit
Red: left middle section. Polyester double knit. One side is textured, I used the smooth side out.
Green: bottom band front and back. Bottom band on sleeve. Polyester athletic knit
Black: two wide vertical bands in front, two wide horizontal bands in front, one wide black band for the back. Narrow bands (flat piping) separating back yoke from back middle section, and green band on the sleeve. Polyester/lycra double knit.
White: Everything else. Left front yoke, right front middle section, back middle section, sleeves. Rayon/lycra ponte.

Assembly (finally!)
I started by sewing the back yoke to the back middle section, with the thin band folded in half and inserted into the seam like piping.
I sewed the blue right front yoke to the short vertical band, then sewing the white front yoke to the other side of the band. I added the black horizontal band along the bottom of the front yoke.
I sewed the darts in the middle sections. Then I sewed one long side of the vertical band to the red middle section, and the other side to the white middle section. I sewed the top of the middle section to the bottom of the yoke band.
Next, I sewed the back to the front at the shoulders and side seams. I was right, the horizontal band at the bottom of the yoke got into the armhole area, so I trimmed that to shape. I tried it on. Everything looked good.
When I tried on the lining with the sample sleeve, I marked the sleeve at the point where I wanted the green band to start. I marked that point on the pattern, and cut the sleeve at that point. I cut the upper sleeve out of white, and the bottom band out of green.
I sewed the green sections to the bottom of the sleeves, with a strip of black inserted into the seam like piping. Then I sewed the sleeves together, and inserted them into the armholes.
I sewed the final black horizontal band to the green hem band. Then I sewed them together to make a loop. As I sewed the black band to the bottom I realized I made a mistake. One side seam lined up perfectly. The other did not, it fell a few inches short of the other seam on the front of the dress. So, my second mistake was sewing the band without first pinning it in place.
But, it’s just a costume, so I am not recutting the bands and I think the seam could fall in worse places. So I left it alone.
I inserted the lining by sewing along the neck edge, and turning the lining in. Unfortunately, the lining wanted to roll out. I trimmed the seam allowance as narrow as I could, then hand tacked the lining to the dress on each side of the black band and at the shoulder seams.
I used the coverstitch machine and green variegated thread to hem the skirt and sleeves.
