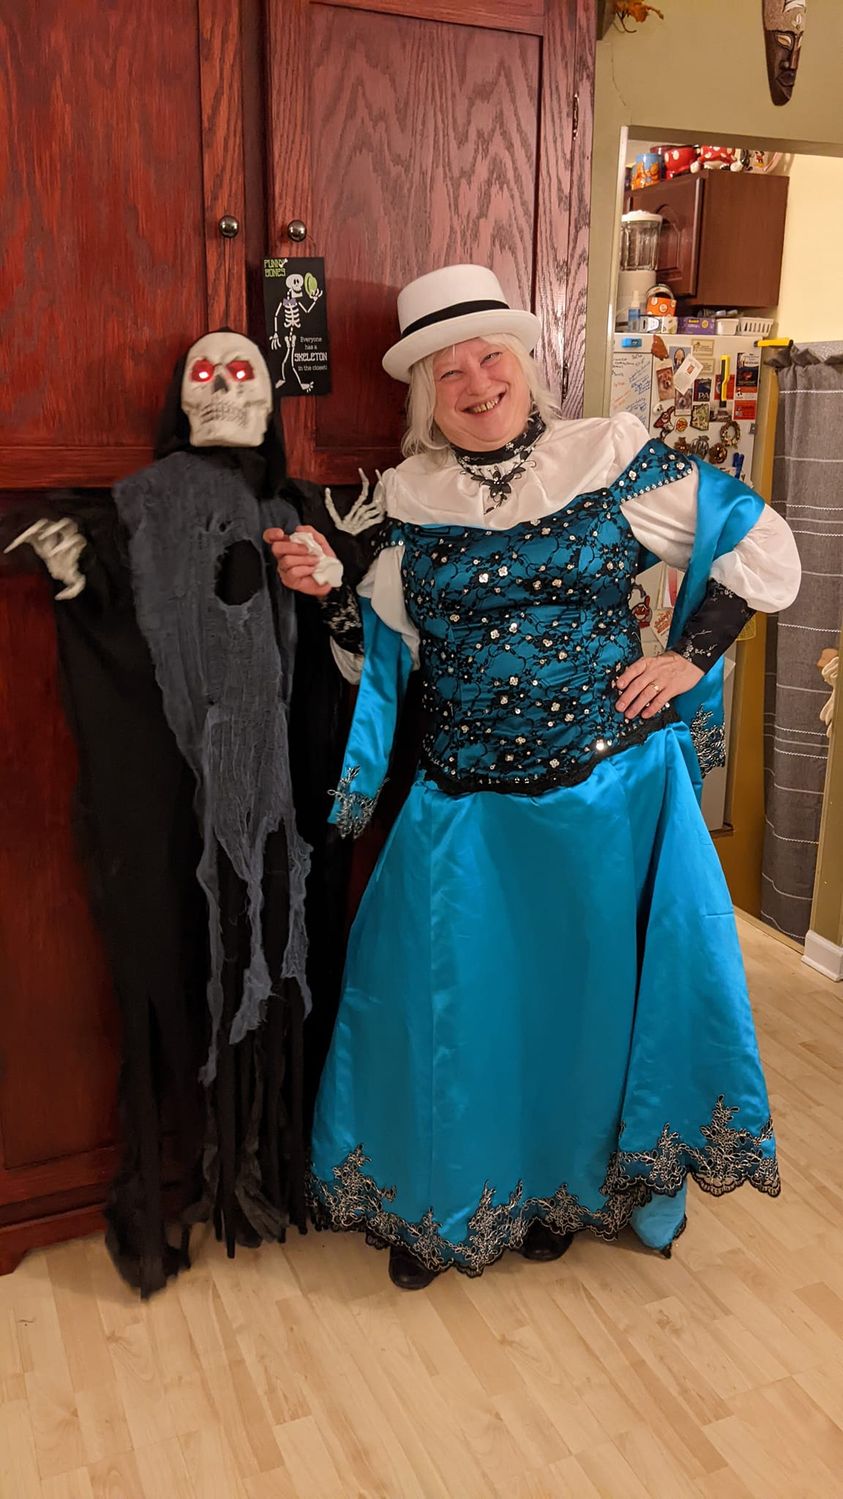
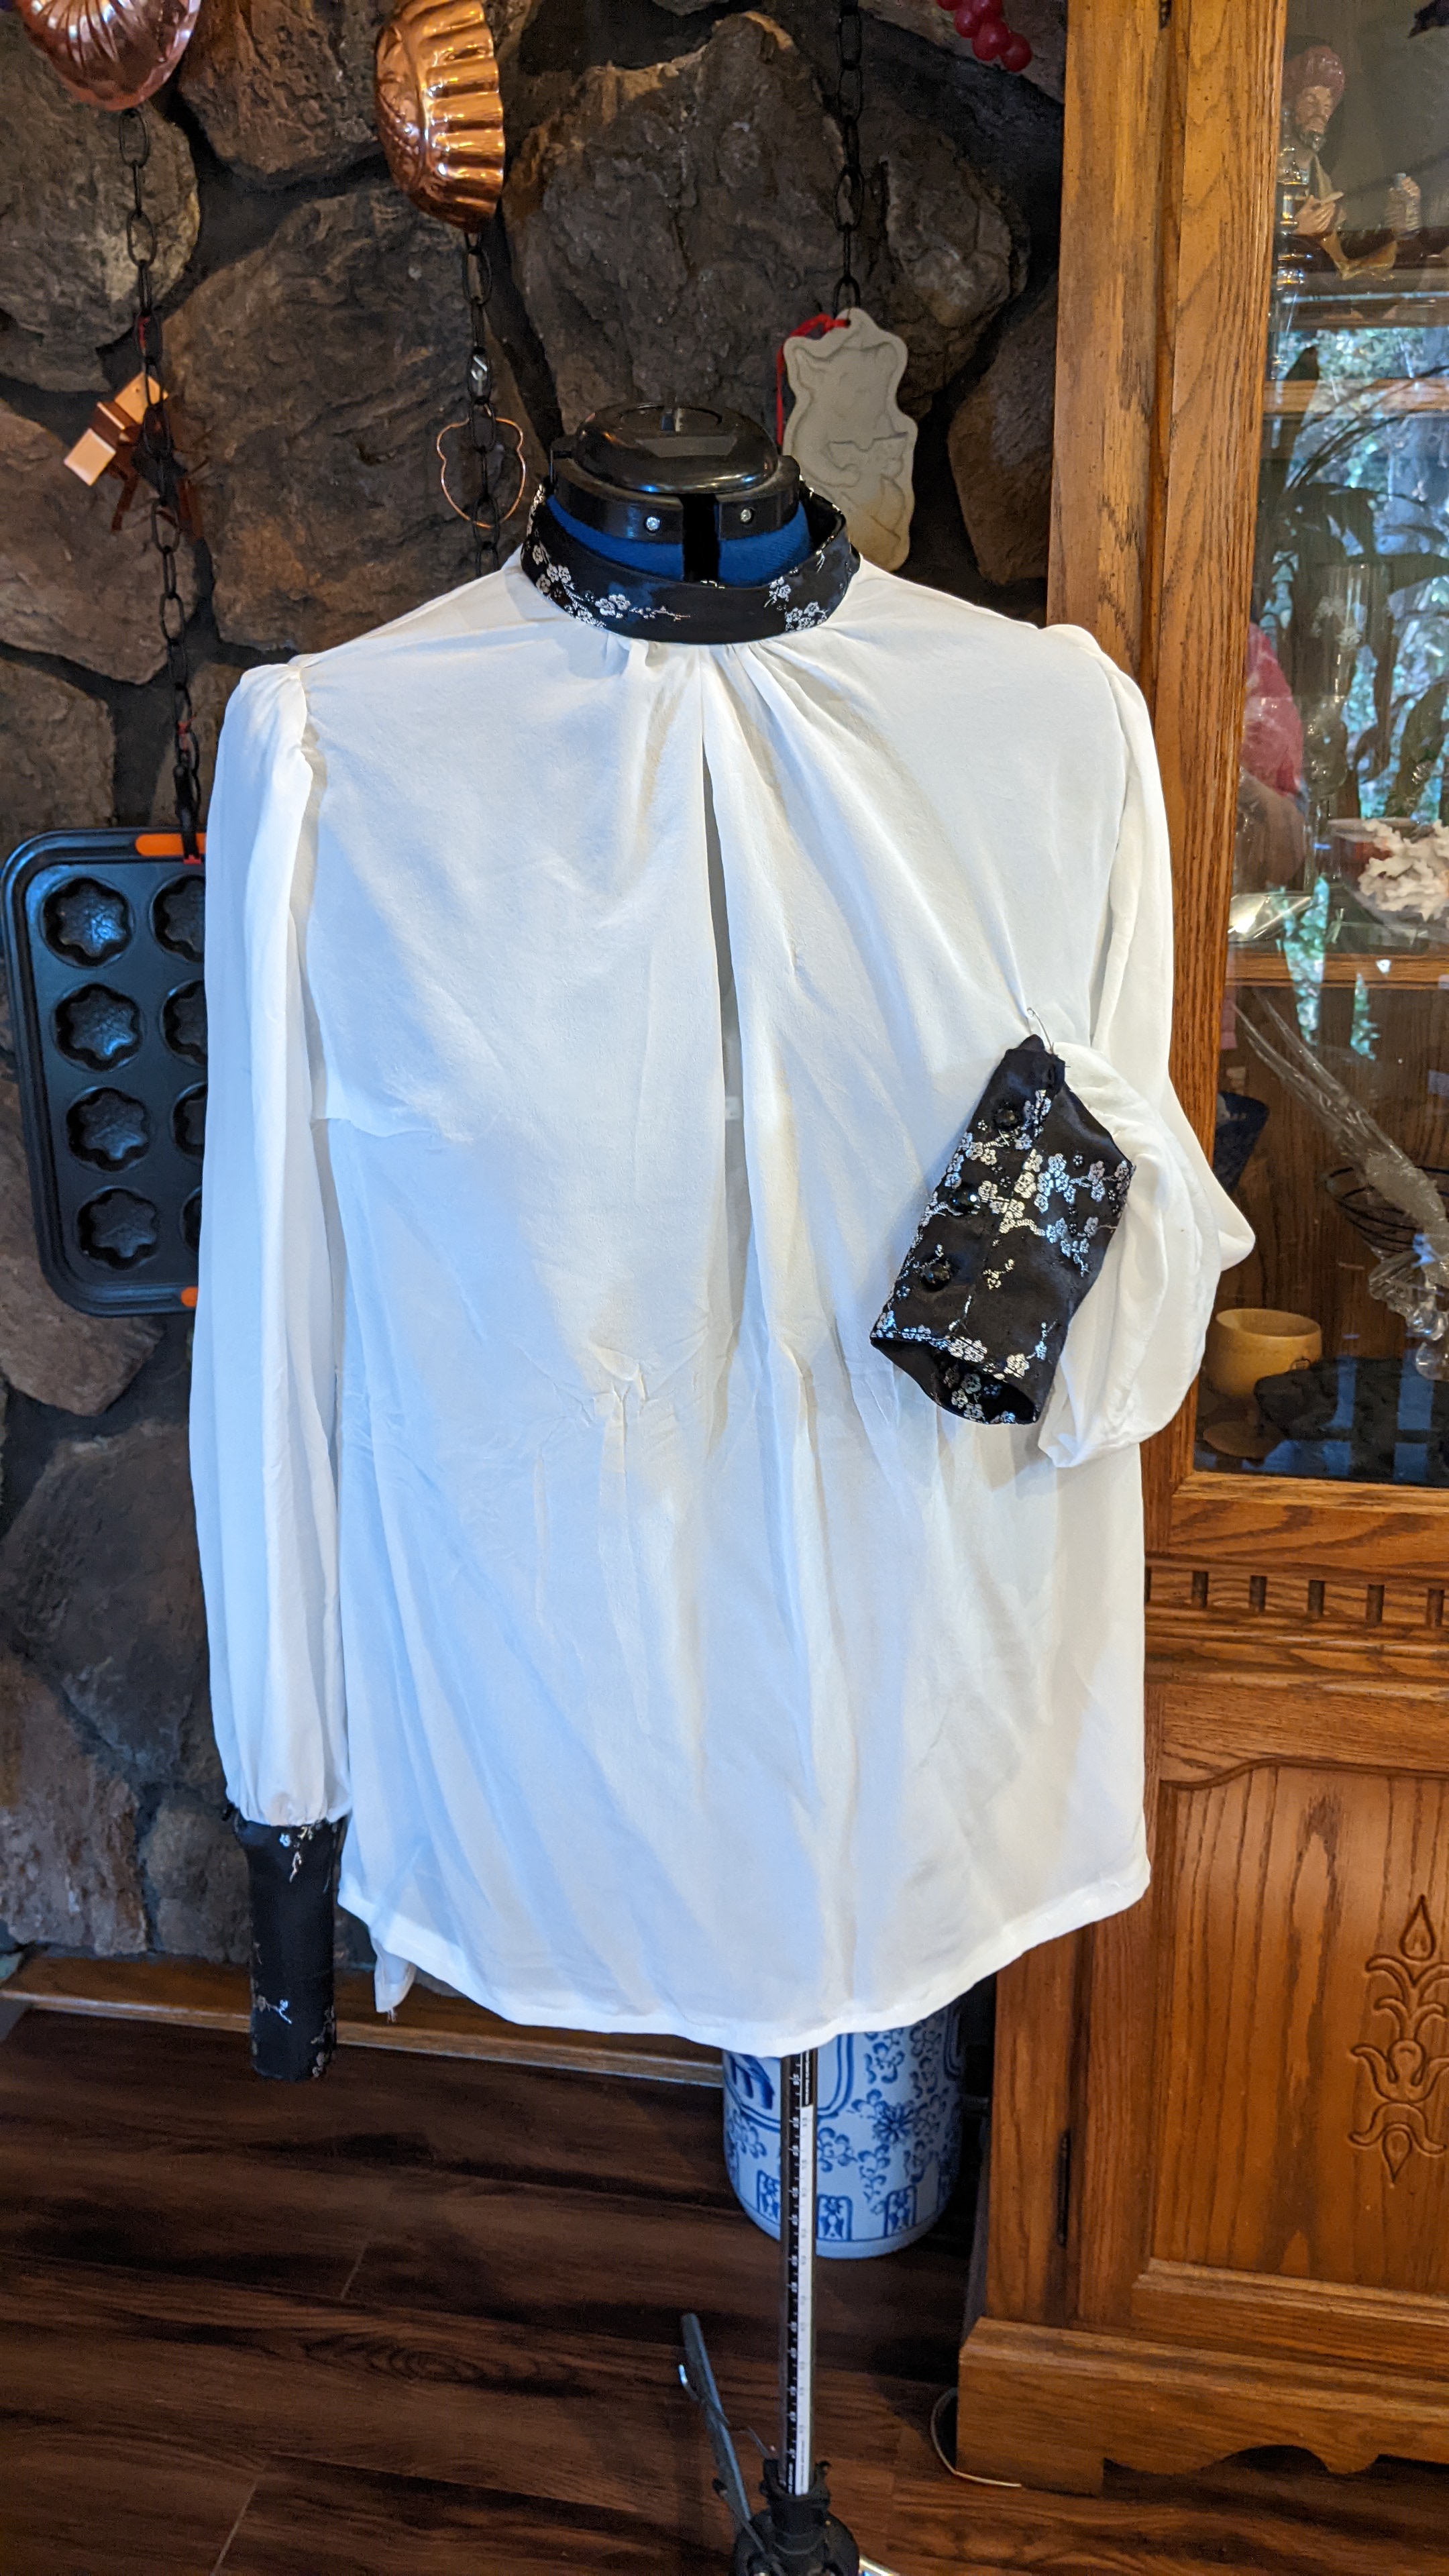
My goal is a dressy blouse that I can wear for the winter holidays, and, well, maybe as part of my Halloween Steampunkish costume.
My vision is a high collared blouse with full sleeves and a deep cuff. The blouse will be white silk crepe from Dharma Trading. The collar and deep cuffs will be a black and silver satin brocade from the stash.
I’ve made several versions of B 6487. I did a FBA with side darts, and moved the back zipper to the left shoulder. I’m keeping both alterations for this version.
B 6487 has several long sleeve options, but they’re either fairly straight or ruffled at the hem. I want a completely different kind of sleeve.
I borrowed the sleeve itself from vintage McCalls 7759 and drafted my own 5 ” deep cuff.
Many newer patterns tend to put the cuff opening in the underarm seam. It does NOT belong there! Yes, some cheapy cheap RTW places do that, but it’s not comfortable. So I was happy this vintage sleeve had a spot for the slit already marked on the pattern.
I cut the three main silk pieces, front, back and sleeves, first. I sewed the darts, side and right shoulder seams. I basted the left side together, that will have to come apart for the invisible zip.
Next I made the cuffs and collar out of the black and silver satin. I attached the collar to the blouse.
Next comes the invisible zip. The last invisible zip I inserted was a nightmare that took forever! But this time it went in smoothly. I finished the collar by stitching the facing in the ditch (hiding the stiches in the neck seam).
I made an interfaced, faced slit in each sleeve, sewed the underarm seams, and ran gathering stitches along the hems and ease stitching along the cap. I attached the cuffs, then the finished sleeves to the blouse. I reinforced the section over the invisible zip with extra stitching.
Last I finished a bit of the collar around the zip by hand, and topstitched a hem.
I like my blouse! I was aiming for steampunk or gothic or Victorian, but I think the black and white give it an ecclesiastical feeling.
Mary Brooks Pickens wrote over 100 books on dressmaking and needlework. She established the Women’s Institute of Domestic Arts and Sciences in 1916. The One Hour Dress is one of her creations.
Disclaimer: I have NOT made anything from these instructions – yet.
The book I’m reviewing is a reprint from 2017. The original One Hour Dress was released in 1923. The dress is clearly a classic 1920’s style, with a dropped waist, long midi length skirt and optional cut on sleeves.
REVIEW
There’s no chapters, this little book is under 20 pages. The closest to chapters or sections are the steps.
The first couple of pages are a kind of introduction, heavily illustrated with variations of the One Hour Dress (OHD). The very first page includes an advertising blurb about Mary Brooks Pickens making the OHD in Grand Central Station in just 34 minutes!
Of course, this kind of speed only comes with time and repetition. She did not need to take body measurements, and knew exactly what to do, and when and how to do it. The kind of fabric she used is never mentioned, but IMHO, she probably used a very easy to sew fabric.
Step One is taking your body measurements. The instructions for taking each measurement are illustrated with clear line drawings, and a chart for recording your measurements is included.
Step Two is material prep. Suggested yardages, based on material width and body measurements, is provided. The yardage is divided into two pieces, one for the blouse and one for the skirt. A line drawing is included, along with a photo of a woman – I assume it is Mary Brooks Pickens – measuring out fabric.
Step Three shows how to cut out the belt and skirt. Again a line drawing is provided, along with another photo.
Step Four shows how to cut out the blouse. This is a little more complicated, and divided into two sections. First the fabric is folded and the neck is cut out. Second, the fabric is refolded and the bodice (and cut on sleeves) are cut out. There’s three line drawings, but only one photo, this time she’s cutting the fabric with scissors.
Step Five is applying the neck and sleeve bindings, using pre-made bias tape. She suggests purchased tape or home made coordinating tape. The line drawing depicts all three steps in the process, but no photo.
Step Six is joining the blouse to the skirt, using narrow 3/8″ seams. Again there is a clear line drawing, and this time the photo shows our lovely lady with a measuring tape draped around her neck, sitting at a vintage 1920s style sewing machine.
Step Seven explains how to finish the edges of the skirt front, clipping and folding to form a faux binding. The line drawing depicts all three steps, but no photo.
Step Eight is stitching the side seams. The line drawing is important for this step, because it’s the only place that indicates the seam is 3/8″. This photo is almost identical to the photo from step 6, just tiny differences.
Step Nine explains how to make the belt and a neat little bow accent for the belt. The line drawing is clear, and in this photo our lady is still at her sewing machine
Step Ten shows how to finish and wear the dress. This is the step where I realized step 7 talks about the front skirt only, the back is never mentioned, and therefore, never finished. The raw edges are tucked under the front skirt. The front skirt flaps flop decoratively down from the hips, and the front of the skirt wraps around the back. There are NO side seams in the skirt! There’s no hem, the fabric selvedge finishes the bottom of the skirt. The line drawing shows how to finish and wear the dress. In this photo, our lady is busy ironing.
The final pages are devoted to variations on the OHD. All the variations are drop waist, sleeveless or with cut on sleeves. Fabric suggestions are offered here, along with ideas for combining different fabrics for the blouse and skirt.
Four skirt variations are described, with line drawings, but they are mostly suggestions of how to handle the extra fullness in the skirt. A line drawing depicts a cuff that can be added to the sleeve for extra length. Suggestions for trims and sash variations are offered.
Two completely different versions of the OHD are presented, an evening version and a daytime streetwear version. The skirt on the evening version is cut in one piece, and includes a lovely lacy flower. Both are shown in line drawings.
The final page explains how to do several other variations shown through out the book, including the version on the cover. There are no line drawings, and the instructions are brief.
CONCLUSION
This is not a must-have book. I must be honest – most people are not looking to make a 1920s style dress, or construct clothing without a pattern. So, most people will probably not be interested in this book except as a novelty or historical item (in my case, only the contents are historical, the book itself is a recent reproduction)
This book might be for you if: If you want to make authentic 1920s dresses. If you want to experiment with creating clothing from shapes instead of patterns. If you are interested in historical sewing. If you like old sewing novelties.
I like this little book. The next time I need a 1920 dress I just might try my own variation of the OHD. But, I’m a little surprised at the lack of side seams. It seems almost scandalous for that era!
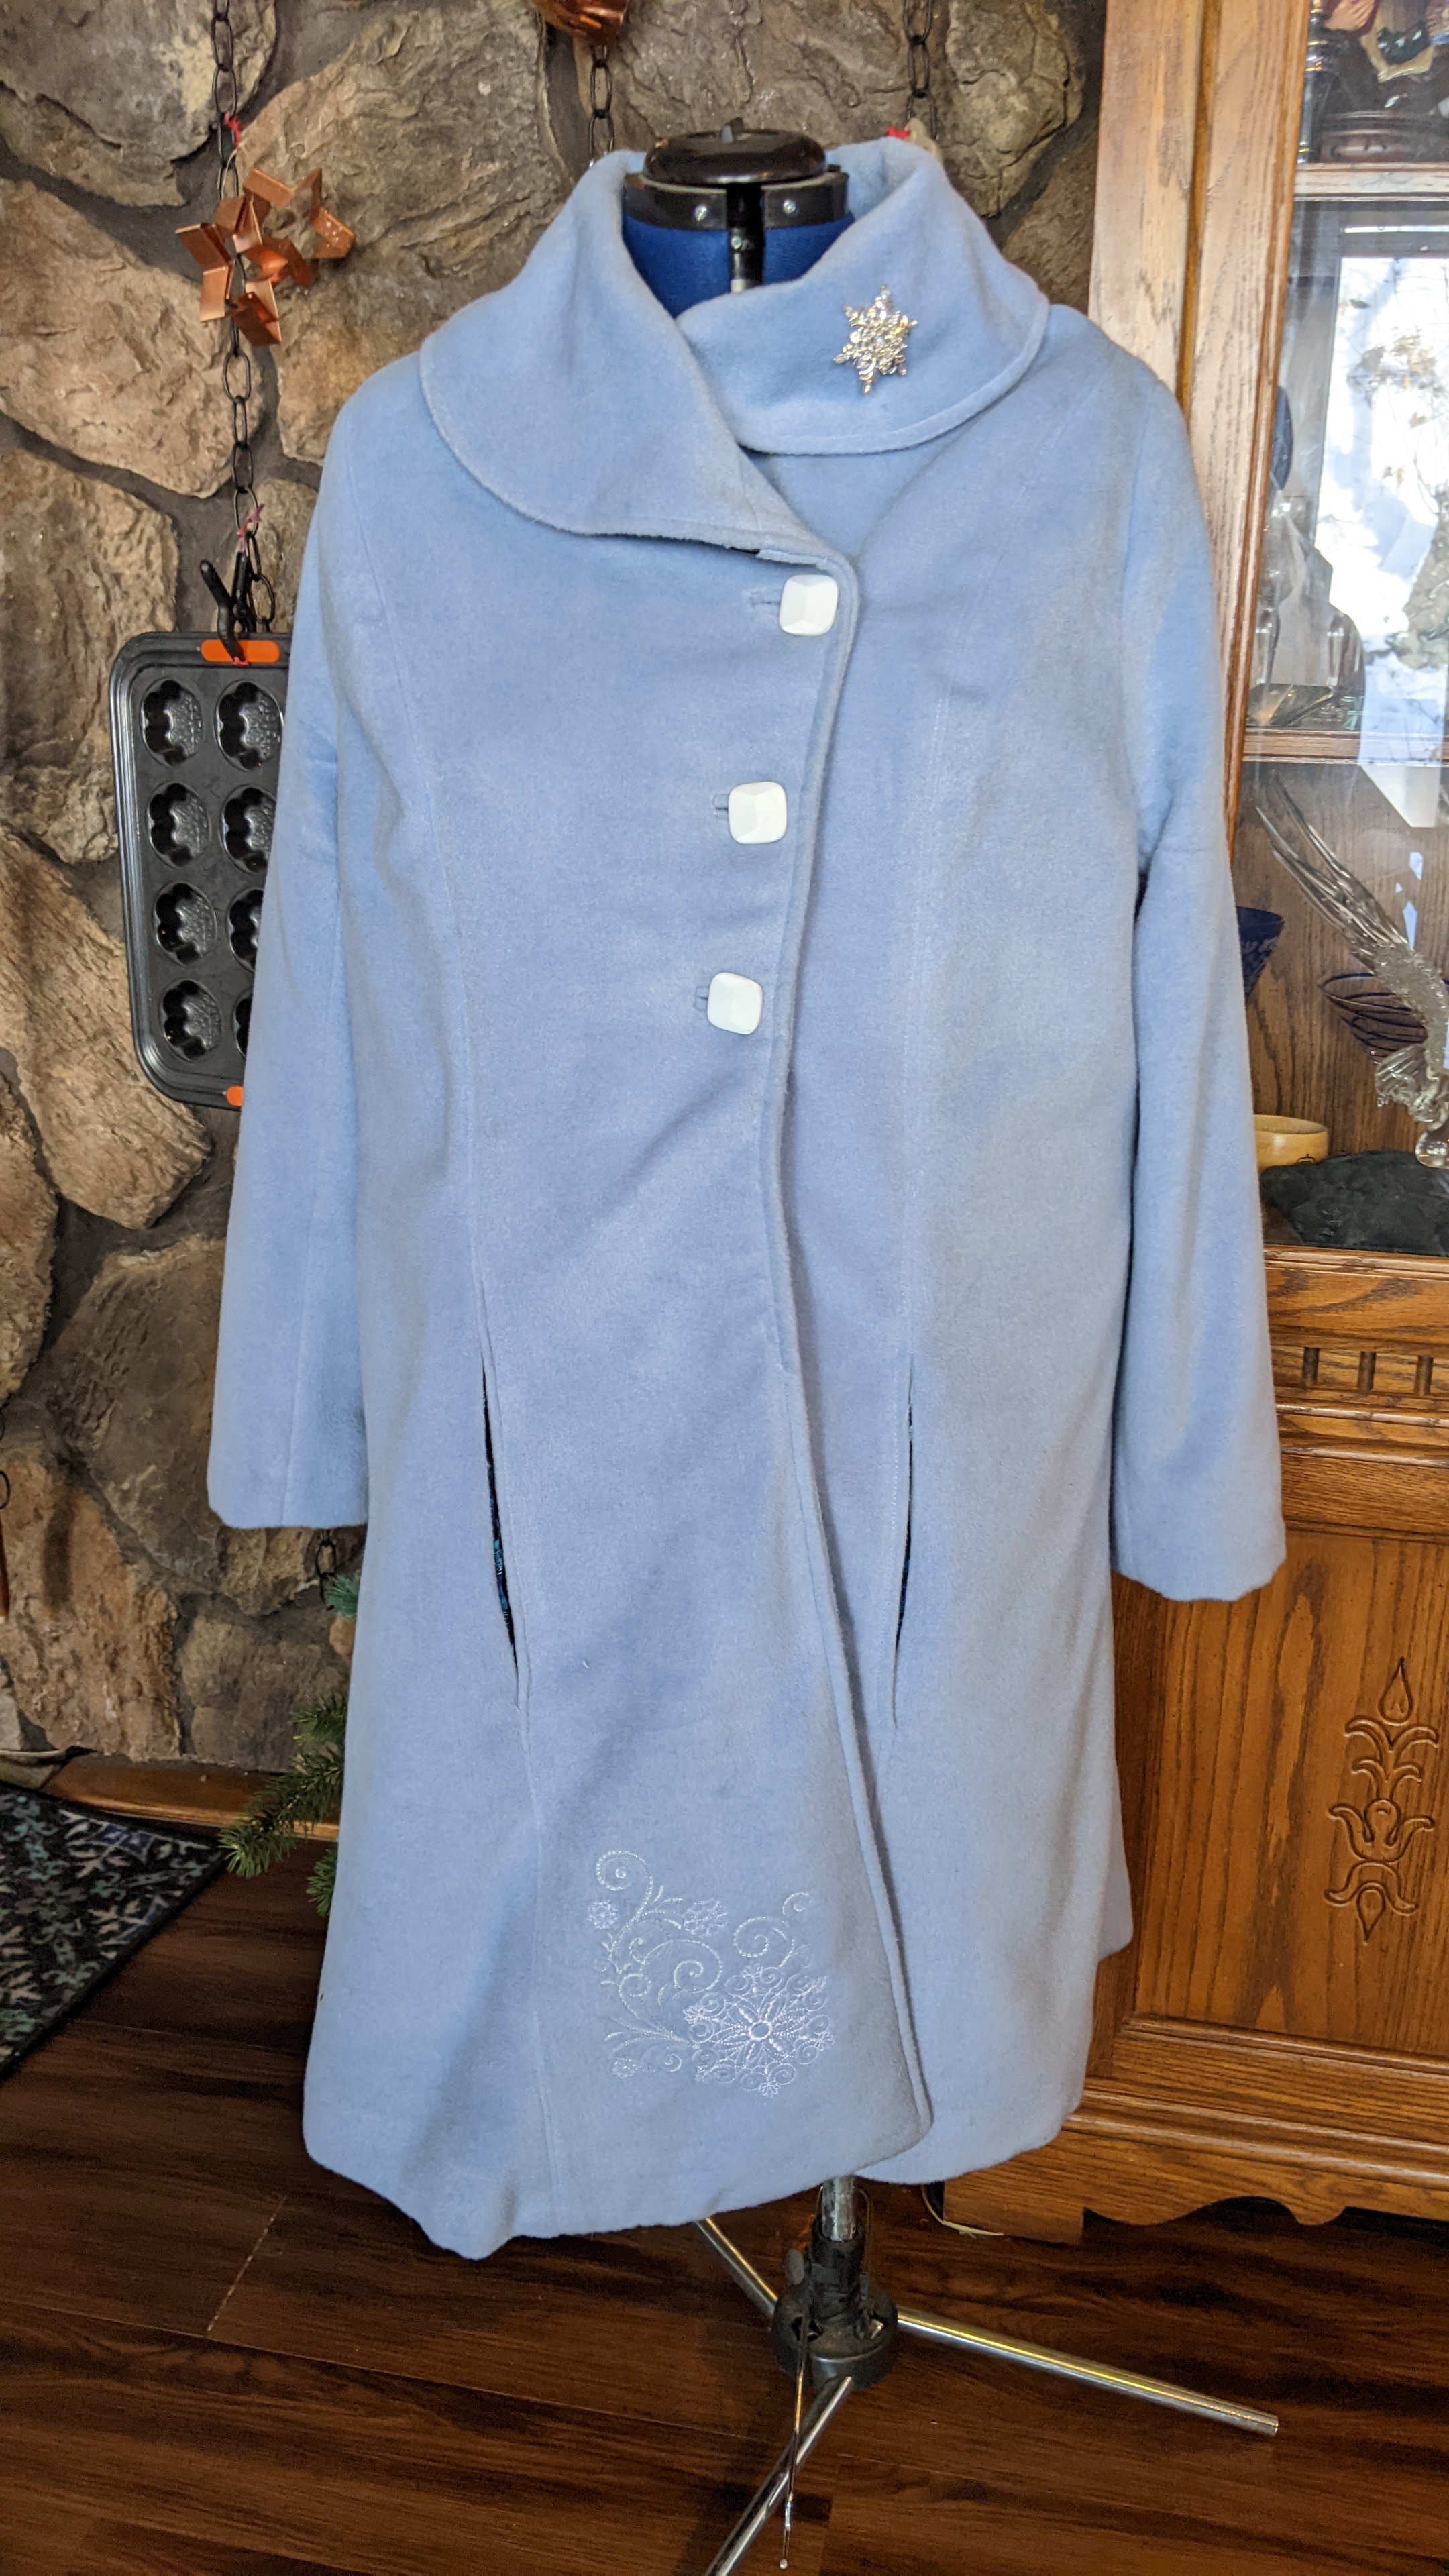
I was inspired by several high end wool coats decorated with embroidery. I made this coat, Butterick 6407 my “Frozen” or “Elsa” coat, last year. This year I decided to spice it up a bit with a near tone-on-tone snowflake.
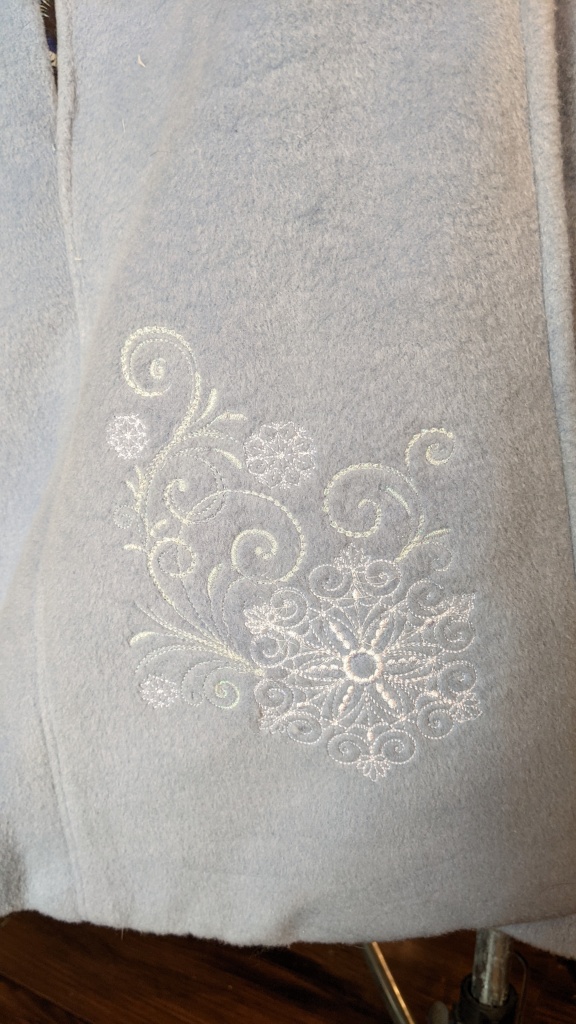
I downloaded this snowflake from EmbroideryDesigStore on Etsy. It’s two separate designs, one is monochrome the other is two tone, with the swirls one color and the large and small flakes a different color. This is the design I used.
I opened up the hem of the coat to add the embroidery. The interfaced cashmere-nylon-wool blend was just too thick and stiff to hoop, so I hooped a sticky stabilizer and stuck the coat to that. I used a white glitter thread for the swirls. The thread was nasty and kept breaking. I will never use glitter thread again! I did the snowflakes in plain white. Because my fabric was kinda thick and nappy, I went over that section of the design twice.
The design stitched out perfectly and beautifully. I am a happy customer! I will buy from them again and recommend them.
It was 1965. Yves St Laurent was close to finishing his Autumn collection when he encountered the work of Piet Mondrian. YSL was so inspired by the patterns – different sized and shaped blocks, mostly white, but occasionally primary red, blue or yellow, divided by solid black lines – that he scrapped a chunk of his nearly completed work to replace them with six Mondrian inspired dresses.
Iconic cover of Vogue magazine, and three versions of the Mondrian dress. Vogue patterns released a sewing pattern for the version in the center on the right.
These dartless, collarless, and (usually) sleeveless shift dresses feature Mondrian-style color blocking. The version that appeared on the cover of Vogue magazine has become the icon dress of the mod, swinging sixties. Many sewists, and women of a certain age who remember that era, are also familiar with the version released as a sewing pattern by Vogue patterns in the 1960s.
Fifty years later Vogue issued a “re-release” of their Mondrian dress, except it wasn’t. It was a hack of a current pattern (9048), a darted shift with a yoke and wide band, with instructions on how to convert the pattern to the color blocking from the original Vogue release. Except this version still has the darts.
Not all six dresses were dramatic walking works of art. The least Mondrian-ish is a shift with a contrasting yoke and long, cuffed sleeves.
A long sleeved version, one of the six originally released by YSL in 1965. This original is at the Victoria and Albert Museum.
My Mondrian dress is for a 1960s murder mystery evening. If I finish it in time, I might also wear it to the sewing expo.
A Great British Sewing Bee challenge featured Mondrian style dresses. A pattern for a dartless version is included in their book From Stitch To Style.
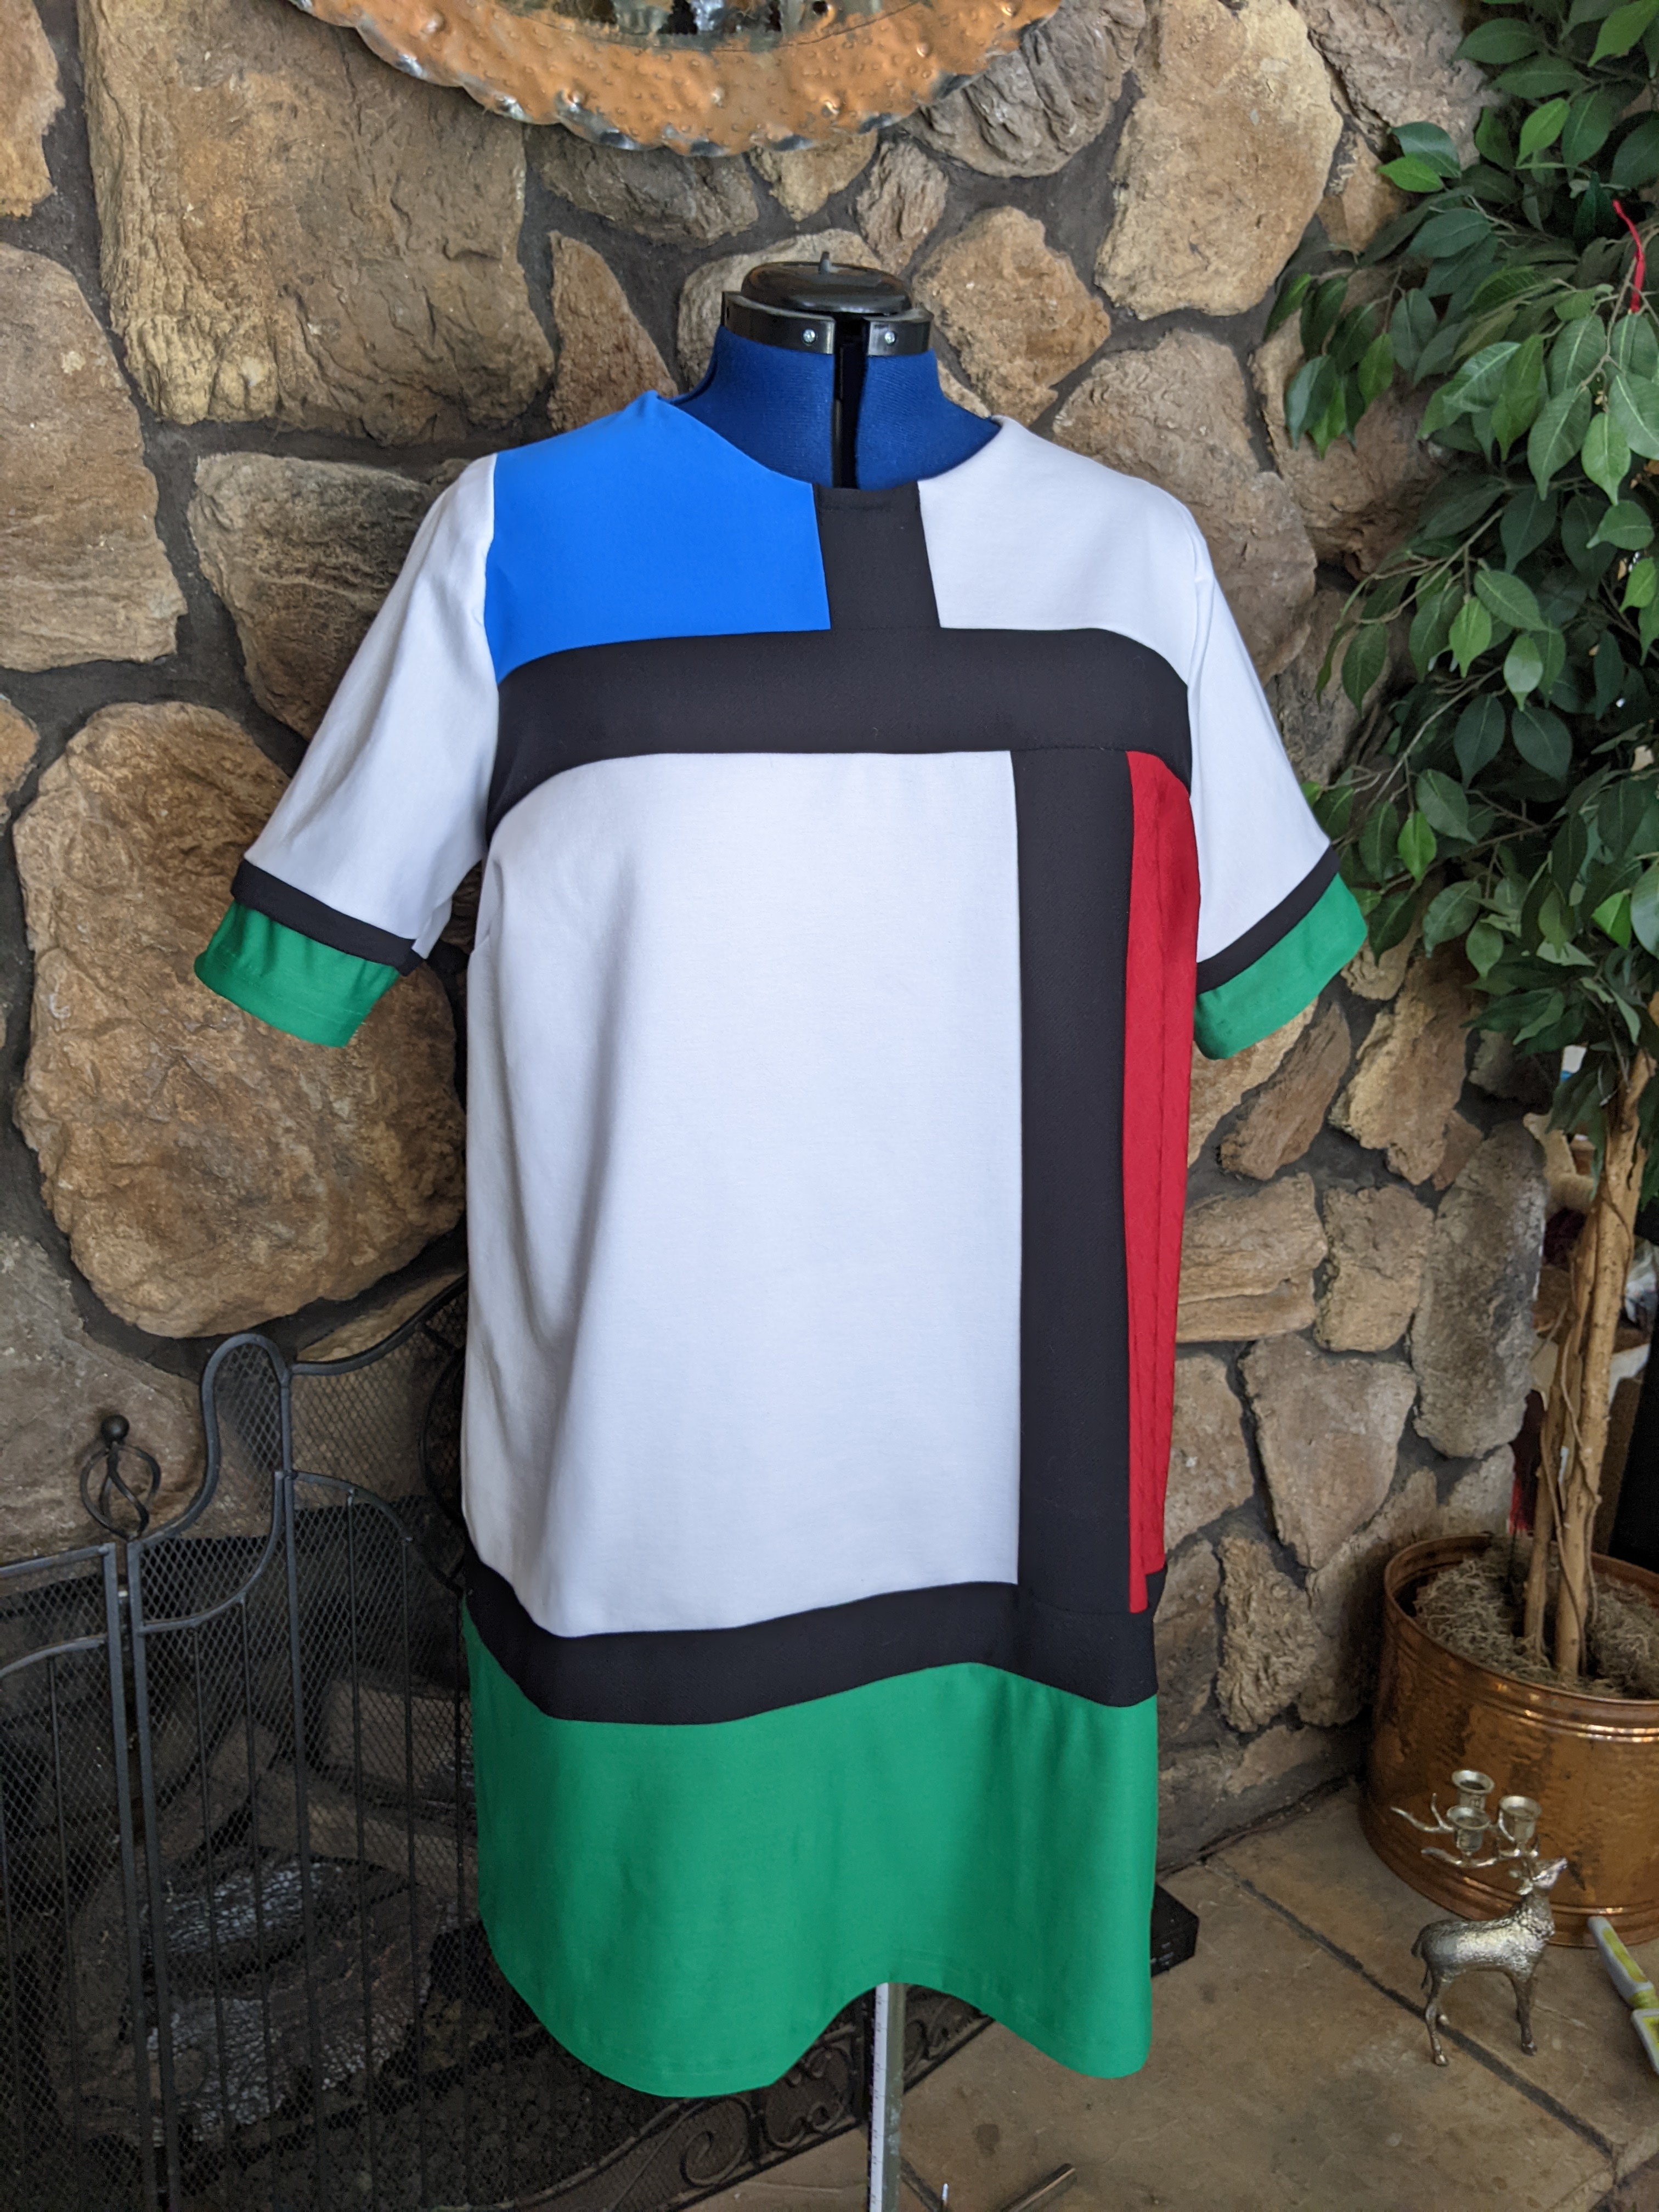
I decided to go with V9048 because I will need fitting adjustments, and it’s just easier to do that with a dart. I’m doing my own design hack. I’m adding narrow bands of black, adding short sleeves, using a 3-part design, and bringing part of the design around to the back. I don’t want the back to look like it belongs on a plain, simple dress, but got lost and ended up behind a colorful Mondrian front.
Line drawing for Vouge 9048
My color scheme is blue, red and green. Yellow is not my friend, and I don’t have any yellow in my stash. The blue and green are 100% poly activewear knit from my stash. The red is a textured 100% poly double knit, used inside out so the smooth interior surface is visible. The black bands are 100% poly double knit, and the base dress is rayon/lycra ponte lined with daisy white poly/lycra ITY knit.
I will make an elbow length sleeve, white on top, green band on the bottom, with a narrow black band in between.
Because my materials are stretchy and this design does not have a fitted waist, I think I can eliminate the back zipper. If things go badly wrong I can always add a side zip.
The Pattern
I always need a full bust/waist adjustment. Most Vogue patterns are not drafted for my body type, so the fba is often just the starting point. For this dress, I do the fba and extend it down to the hem, omitting waist darts and keeping the shape as simple as possible.
I’m going to be literally hacking this pattern apart, so I start by tracing the darted middle section. I add the fba to the tracing, then trace that bodice half again, so I have a left and right piece (one side is the altered tracing, the other is a copy of the altered tracing). I tape the pieces together along the centerline, giving me one large pattern piece. I picked a spot about 2/3 of the way across the piece, and sliced it there from top to bottom, creating the asymmetrical left and right middle pieces.
The front yoke is supposed to be positioned on a fold at the center front. I’ll skip the fold, and add a seam allowance instead. This should put a seam directly in the center front.
I trace the sleeve pattern piece, shortening it to about elbow length.
Fitting the Lining
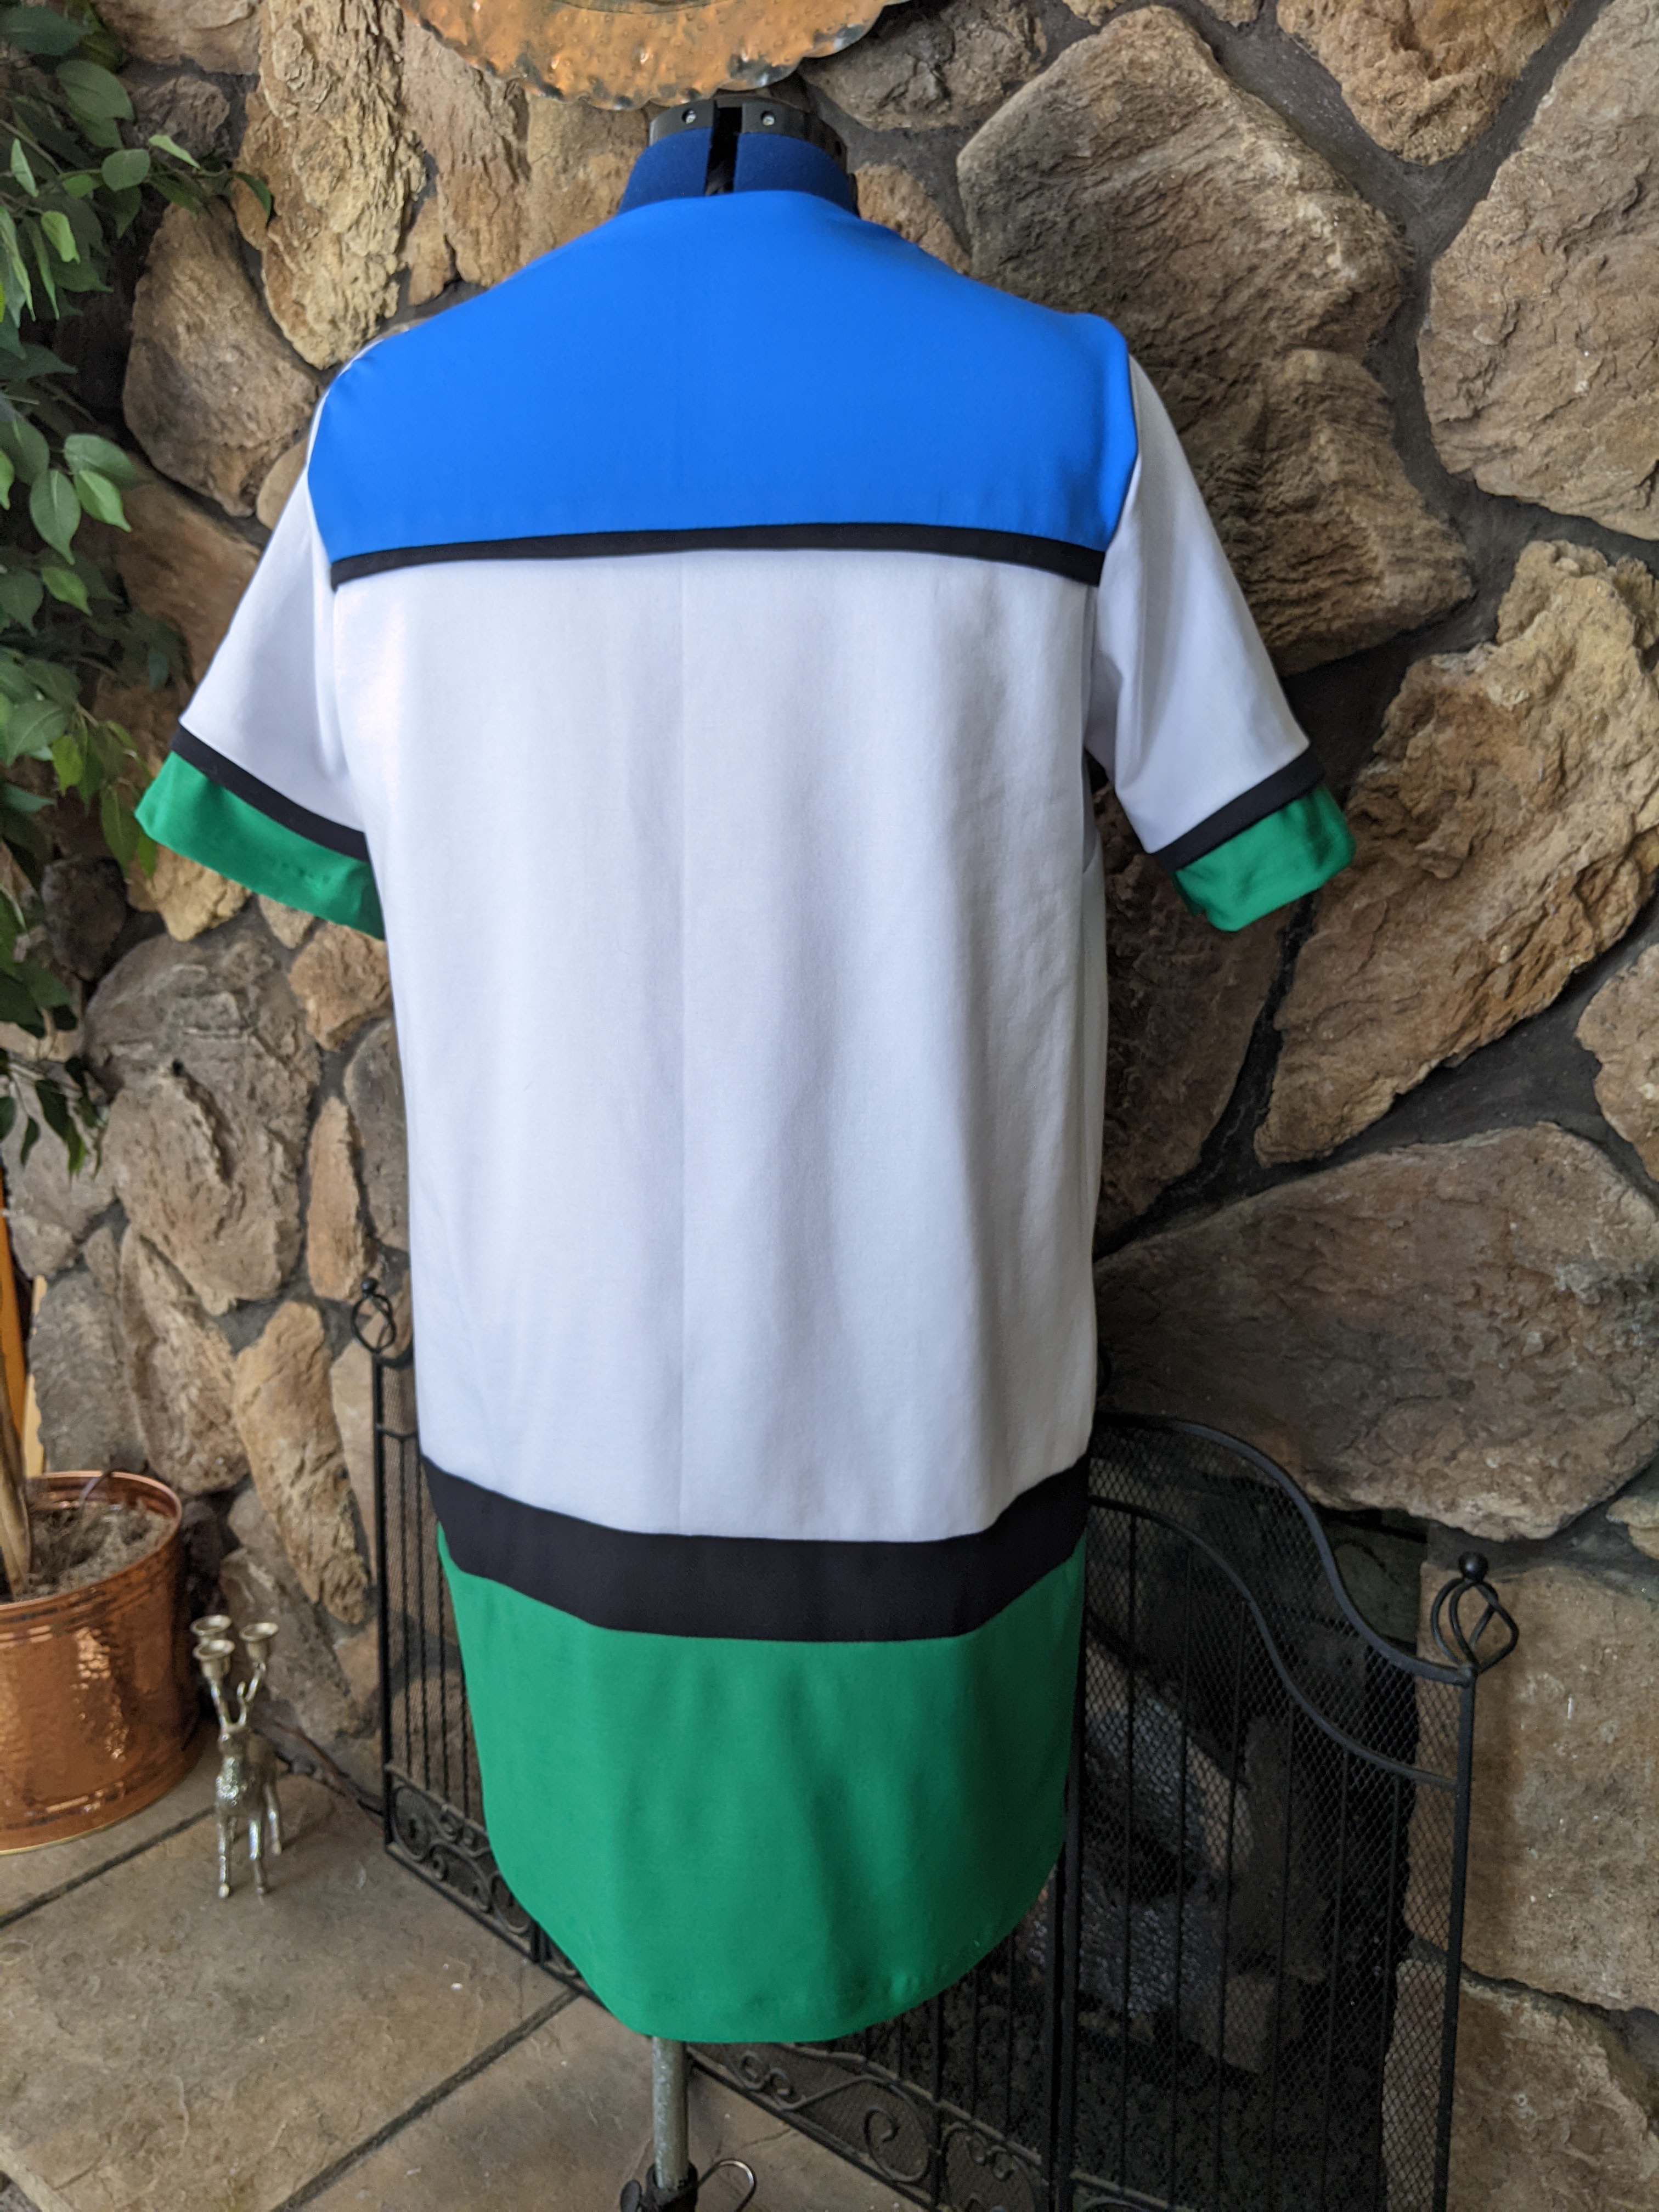
I used the lining to test for fitting and placement of the stripes and blocks. I cut a yoke back, two yoke fronts (because I’m adding a Center Front Seam) and both middle front pieces. For the middle back, I boldly eliminated the Center Back Seam and cut the piece with the centerline positioned on a fold.
I sewed the darts first, then the middle front sections, then the CFS in the front yoke. I sewed the front yoke to the assembled middle front, the back yoke to the middle back, and front and back yokes together at the shoulders. Last step was sewing the side seams. I used a narrow zig zag stitch.
One of the pins marking a dart fell out during construction, so one of the darts came out wrong on the first try. I also felt the armhole was a little bit big, and the bust points sat a bit low. I fixed this by cutting 1″ off the top of the front and back middle sections. This reduced the size of the armhole and raised the bust points up to the right place. The middle back section also came out a bit short, so I added an extra band to bring it to the correct length. The sample sleeve fit in the armhole and was a good length.
I cut one sample sleeve from lining material, sewed it up, and inserted it into an armhole. It looked good.
I decided I wanted the seam line between yoke and middle section to be the top edge of the black horizontal band. I also decided the vertical seam line dividing the front section would be one edge of the vertical black band.
Back to the Pattern
Now I had to transfer my changes back to my pattern, adapt the altered pieces to fit the black bands, and create the pattern pieces for the bands.
I cut 1″ of the top of the right and left front middle section and and back middle section to match the alteration I made to the lining. I added the extra needed length to the back middle piece.
I want the black bands to have a finished width of 2″. The bands will need a 5/8 seam allowance on each side, so that’s 1-1/4. So each pattern piece needs to be 3-1/4″ wide.
To create the short vertical center band and adapt the yoke pieces I cut 1″ off the center of the right and left front yokes. I’ve already added a s/a to sew the lining pieces together, so that covers the s/a on the yoke side. For the band piece, I cut a rectangle 3-1/4″ wide and 6″ long. The center of the yoke is roughly 5 -5/8, so I align one short edge of the pattern piece along the bottom of the yoke, shaping the top of the to match the neckline.
The horizontal yoke/middle section seam is in the right place for the top edge of the black band, so I don’t need to do anything else to the yoke pattern. There’s already a s/a at the top of the middle sections, so I don’t need to add to worry about that. I just need to compensate for the finished width of the black band by cutting the top 2″ of both front pieces. The problem is, this depth runs into the armhole. It could be a real problem later on. I add a s/a to both long sides of the band to make the pattern piece.
Next the middle sections need to be adjusted for the wide vertical band. The s/a on both side pieces is already there, so again no worries. I just need to remove the 2″ width of the finished band. I do this by taking 1″ off the center front of each side piece.
Finally I cut a second horizontal band that will go all the way around front and back, the thick green band for the very bottom of the dress (that pattern piece was fine, and required no alteration), and a thin band to separate the back yoke from the back middle section.
I’ll worry about the sleeves later.
From this side you can see the misaligned seam. You can also see the difference in drape between the white rayon ponte and the red polyester double knit.
On to the Fabric
Blue: Right front yoke, back yoke. Polyester athletic knit
Red: left middle section. Polyester double knit. One side is textured, I used the smooth side out.
Green: bottom band front and back. Bottom band on sleeve. Polyester athletic knit
Black: two wide vertical bands in front, two wide horizontal bands in front, one wide black band for the back. Narrow bands (flat piping) separating back yoke from back middle section, and green band on the sleeve. Polyester/lycra double knit.
White: Everything else. Left front yoke, right front middle section, back middle section, sleeves. Rayon/lycra ponte.
Assembly (finally!)
I started by sewing the back yoke to the back middle section, with the thin band folded in half and inserted into the seam like piping.
I sewed the blue right front yoke to the short vertical band, then sewing the white front yoke to the other side of the band. I added the black horizontal band along the bottom of the front yoke.
I sewed the darts in the middle sections. Then I sewed one long side of the vertical band to the red middle section, and the other side to the white middle section. I sewed the top of the middle section to the bottom of the yoke band.
Next, I sewed the back to the front at the shoulders and side seams. I was right, the horizontal band at the bottom of the yoke got into the armhole area, so I trimmed that to shape. I tried it on. Everything looked good.
When I tried on the lining with the sample sleeve, I marked the sleeve at the point where I wanted the green band to start. I marked that point on the pattern, and cut the sleeve at that point. I cut the upper sleeve out of white, and the bottom band out of green.
I sewed the green sections to the bottom of the sleeves, with a strip of black inserted into the seam like piping. Then I sewed the sleeves together, and inserted them into the armholes.
I sewed the final black horizontal band to the green hem band. Then I sewed them together to make a loop. As I sewed the black band to the bottom I realized I made a mistake. One side seam lined up perfectly. The other did not, it fell a few inches short of the other seam on the front of the dress. So, my second mistake was sewing the band without first pinning it in place.
But, it’s just a costume, so I am not recutting the bands and I think the seam could fall in worse places. So I left it alone.
I inserted the lining by sewing along the neck edge, and turning the lining in. Unfortunately, the lining wanted to roll out. I trimmed the seam allowance as narrow as I could, then hand tacked the lining to the dress on each side of the black band and at the shoulder seams.
I used the coverstitch machine and green variegated thread to hem the skirt and sleeves.
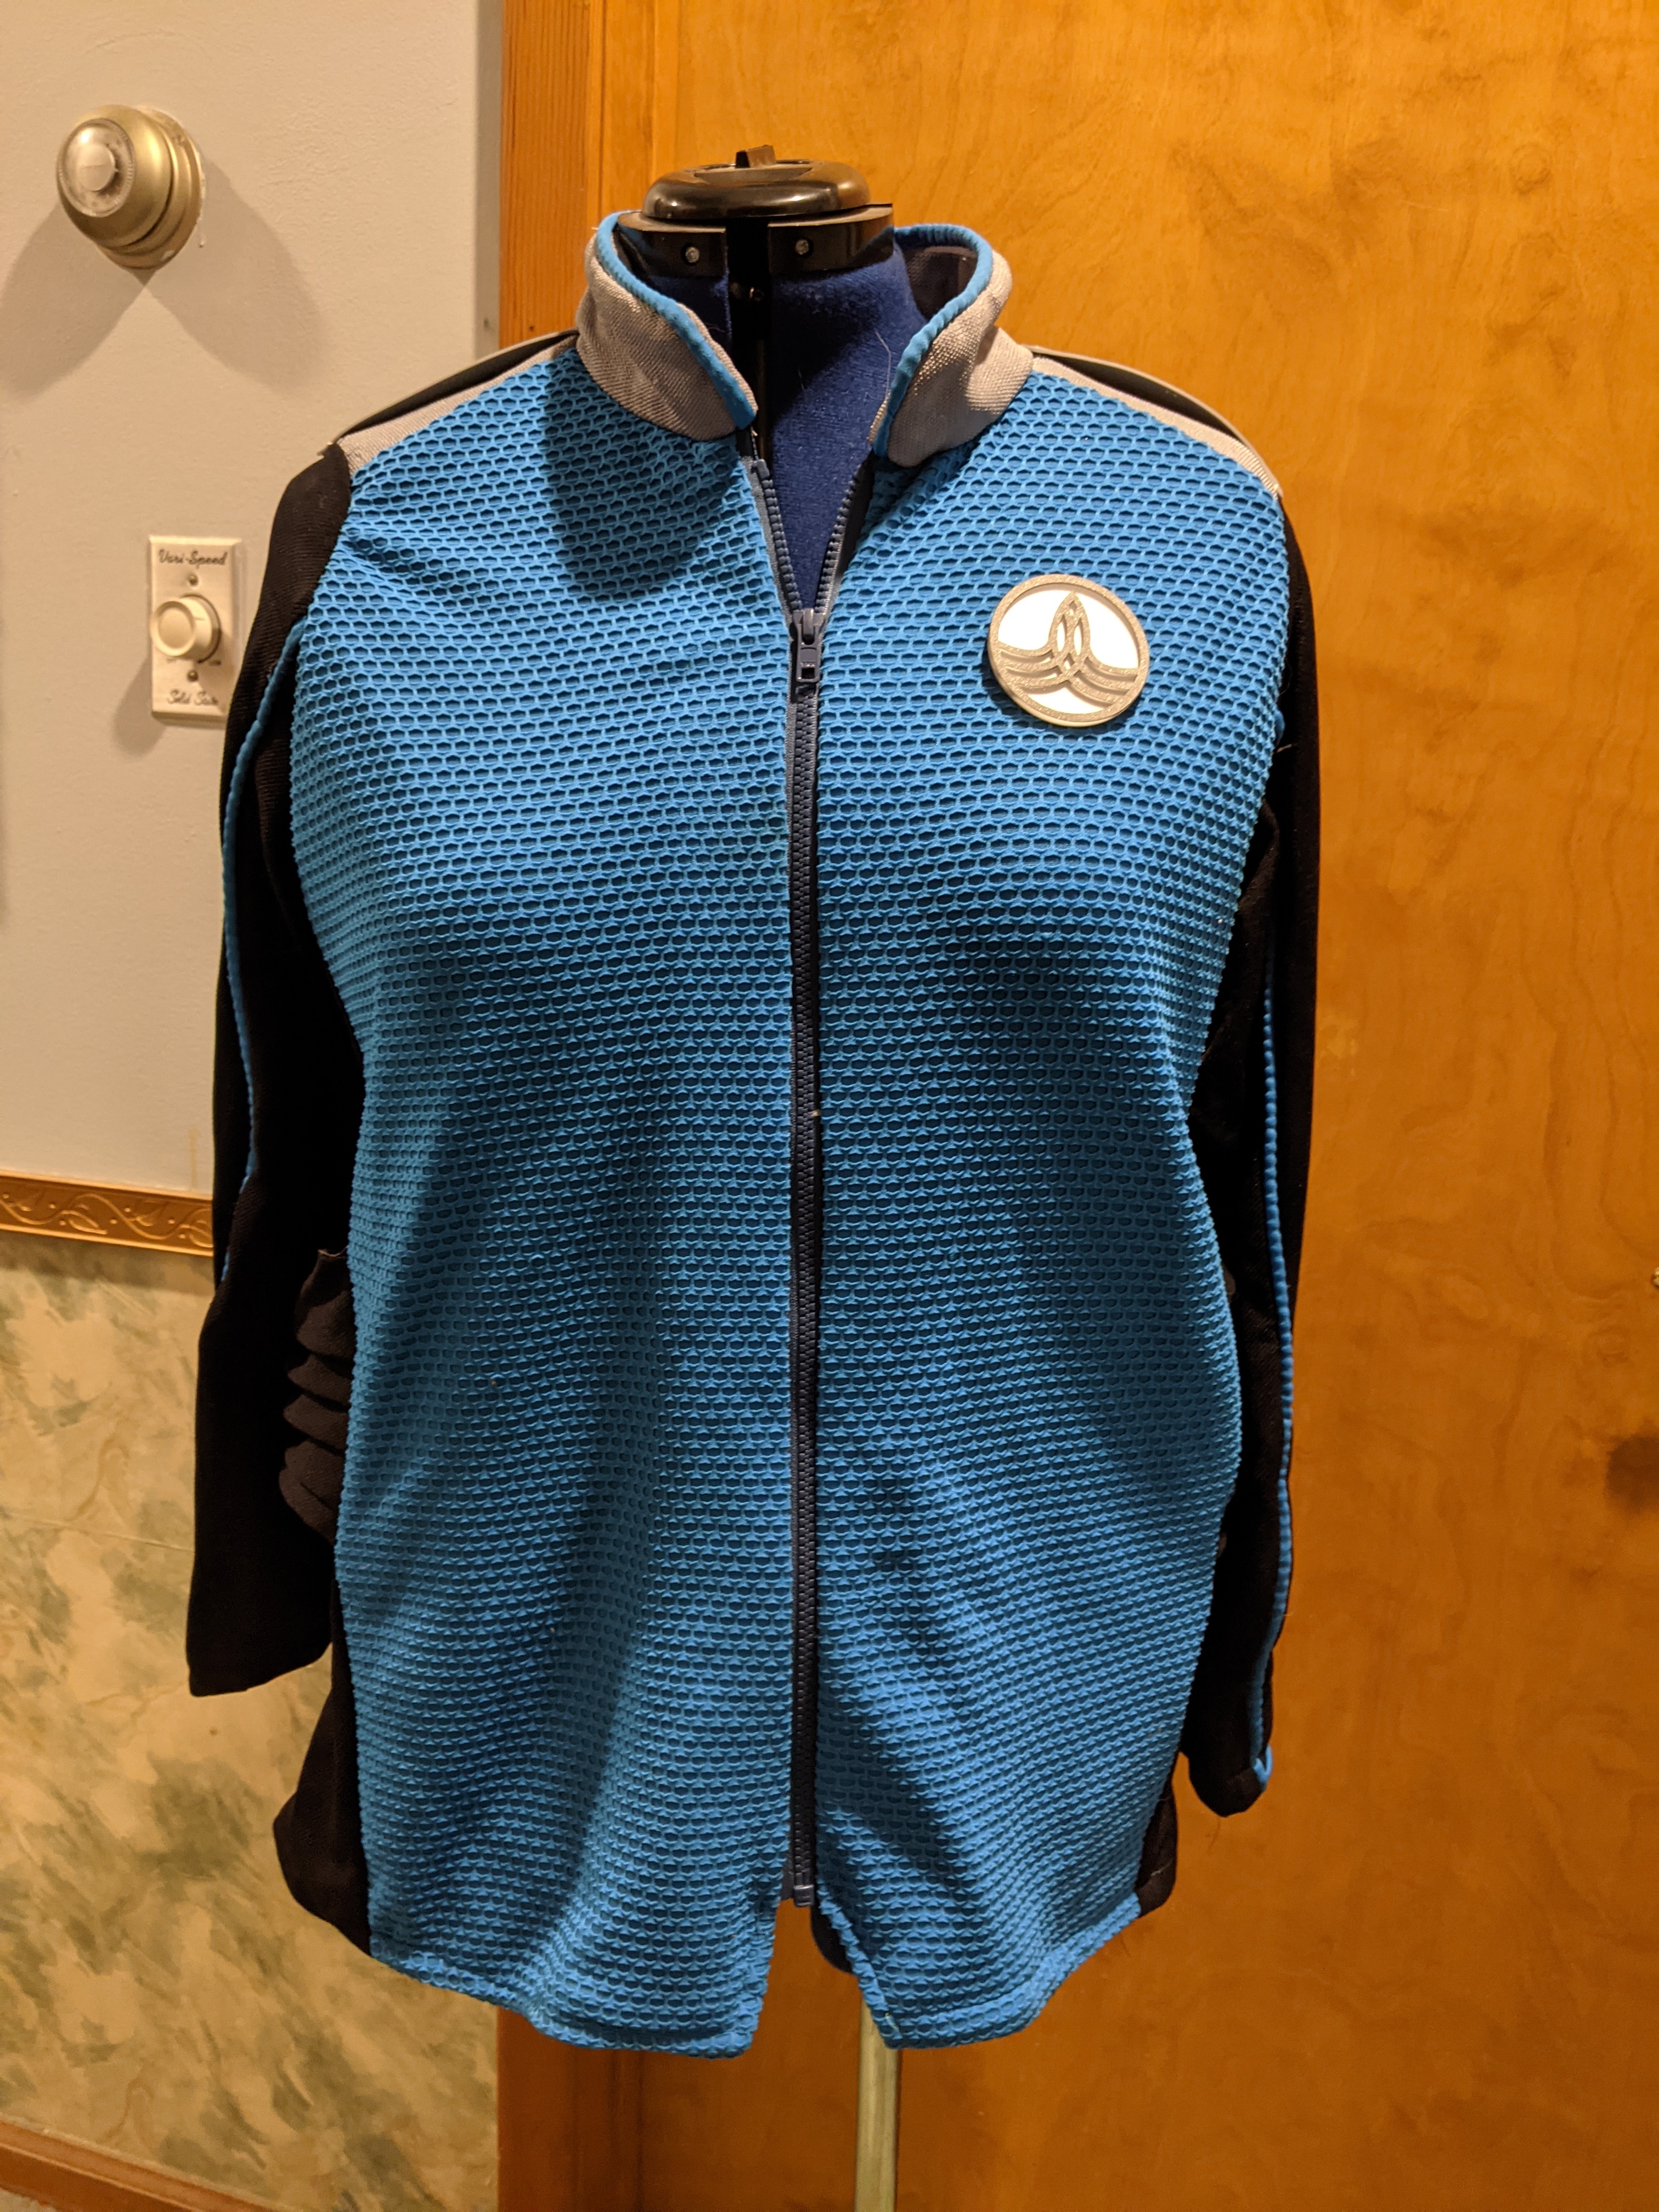
I started my Orville costume in the Before Times. Then came Covid, and everything changed. My Orville costume went into a plastic tub and sat for a few years.
Finally in July of 2021 the Sewing Expo was on! Admission was FREE on Saturday if you wore a costume. An opportunity to wear a costume and free admission? I am there!
It was time to finish my Orville costume.
I used Kwik-Sew as the base pattern for the jacket, because it was designed for knits, had a center front zip, the right kind of collar (but not the right shape) and contrast side panels. My version came out passable and easily identifiable as a character from the show, but it is not an exact replica. I took some, well, Con Crunch liberties.
I knew the sleeves would be the hardest part, so I cut the body out first. The turquoise blue honeycomb knit and metallic silver knit (as close as I could get to the actual fabric) were both soft and kind of thin. So I used a black polyester double knit for the entire body, front, back, side panels and yokes, and used those pieces to back the blue front and back and silver yokes. This gave the whole thing structure.
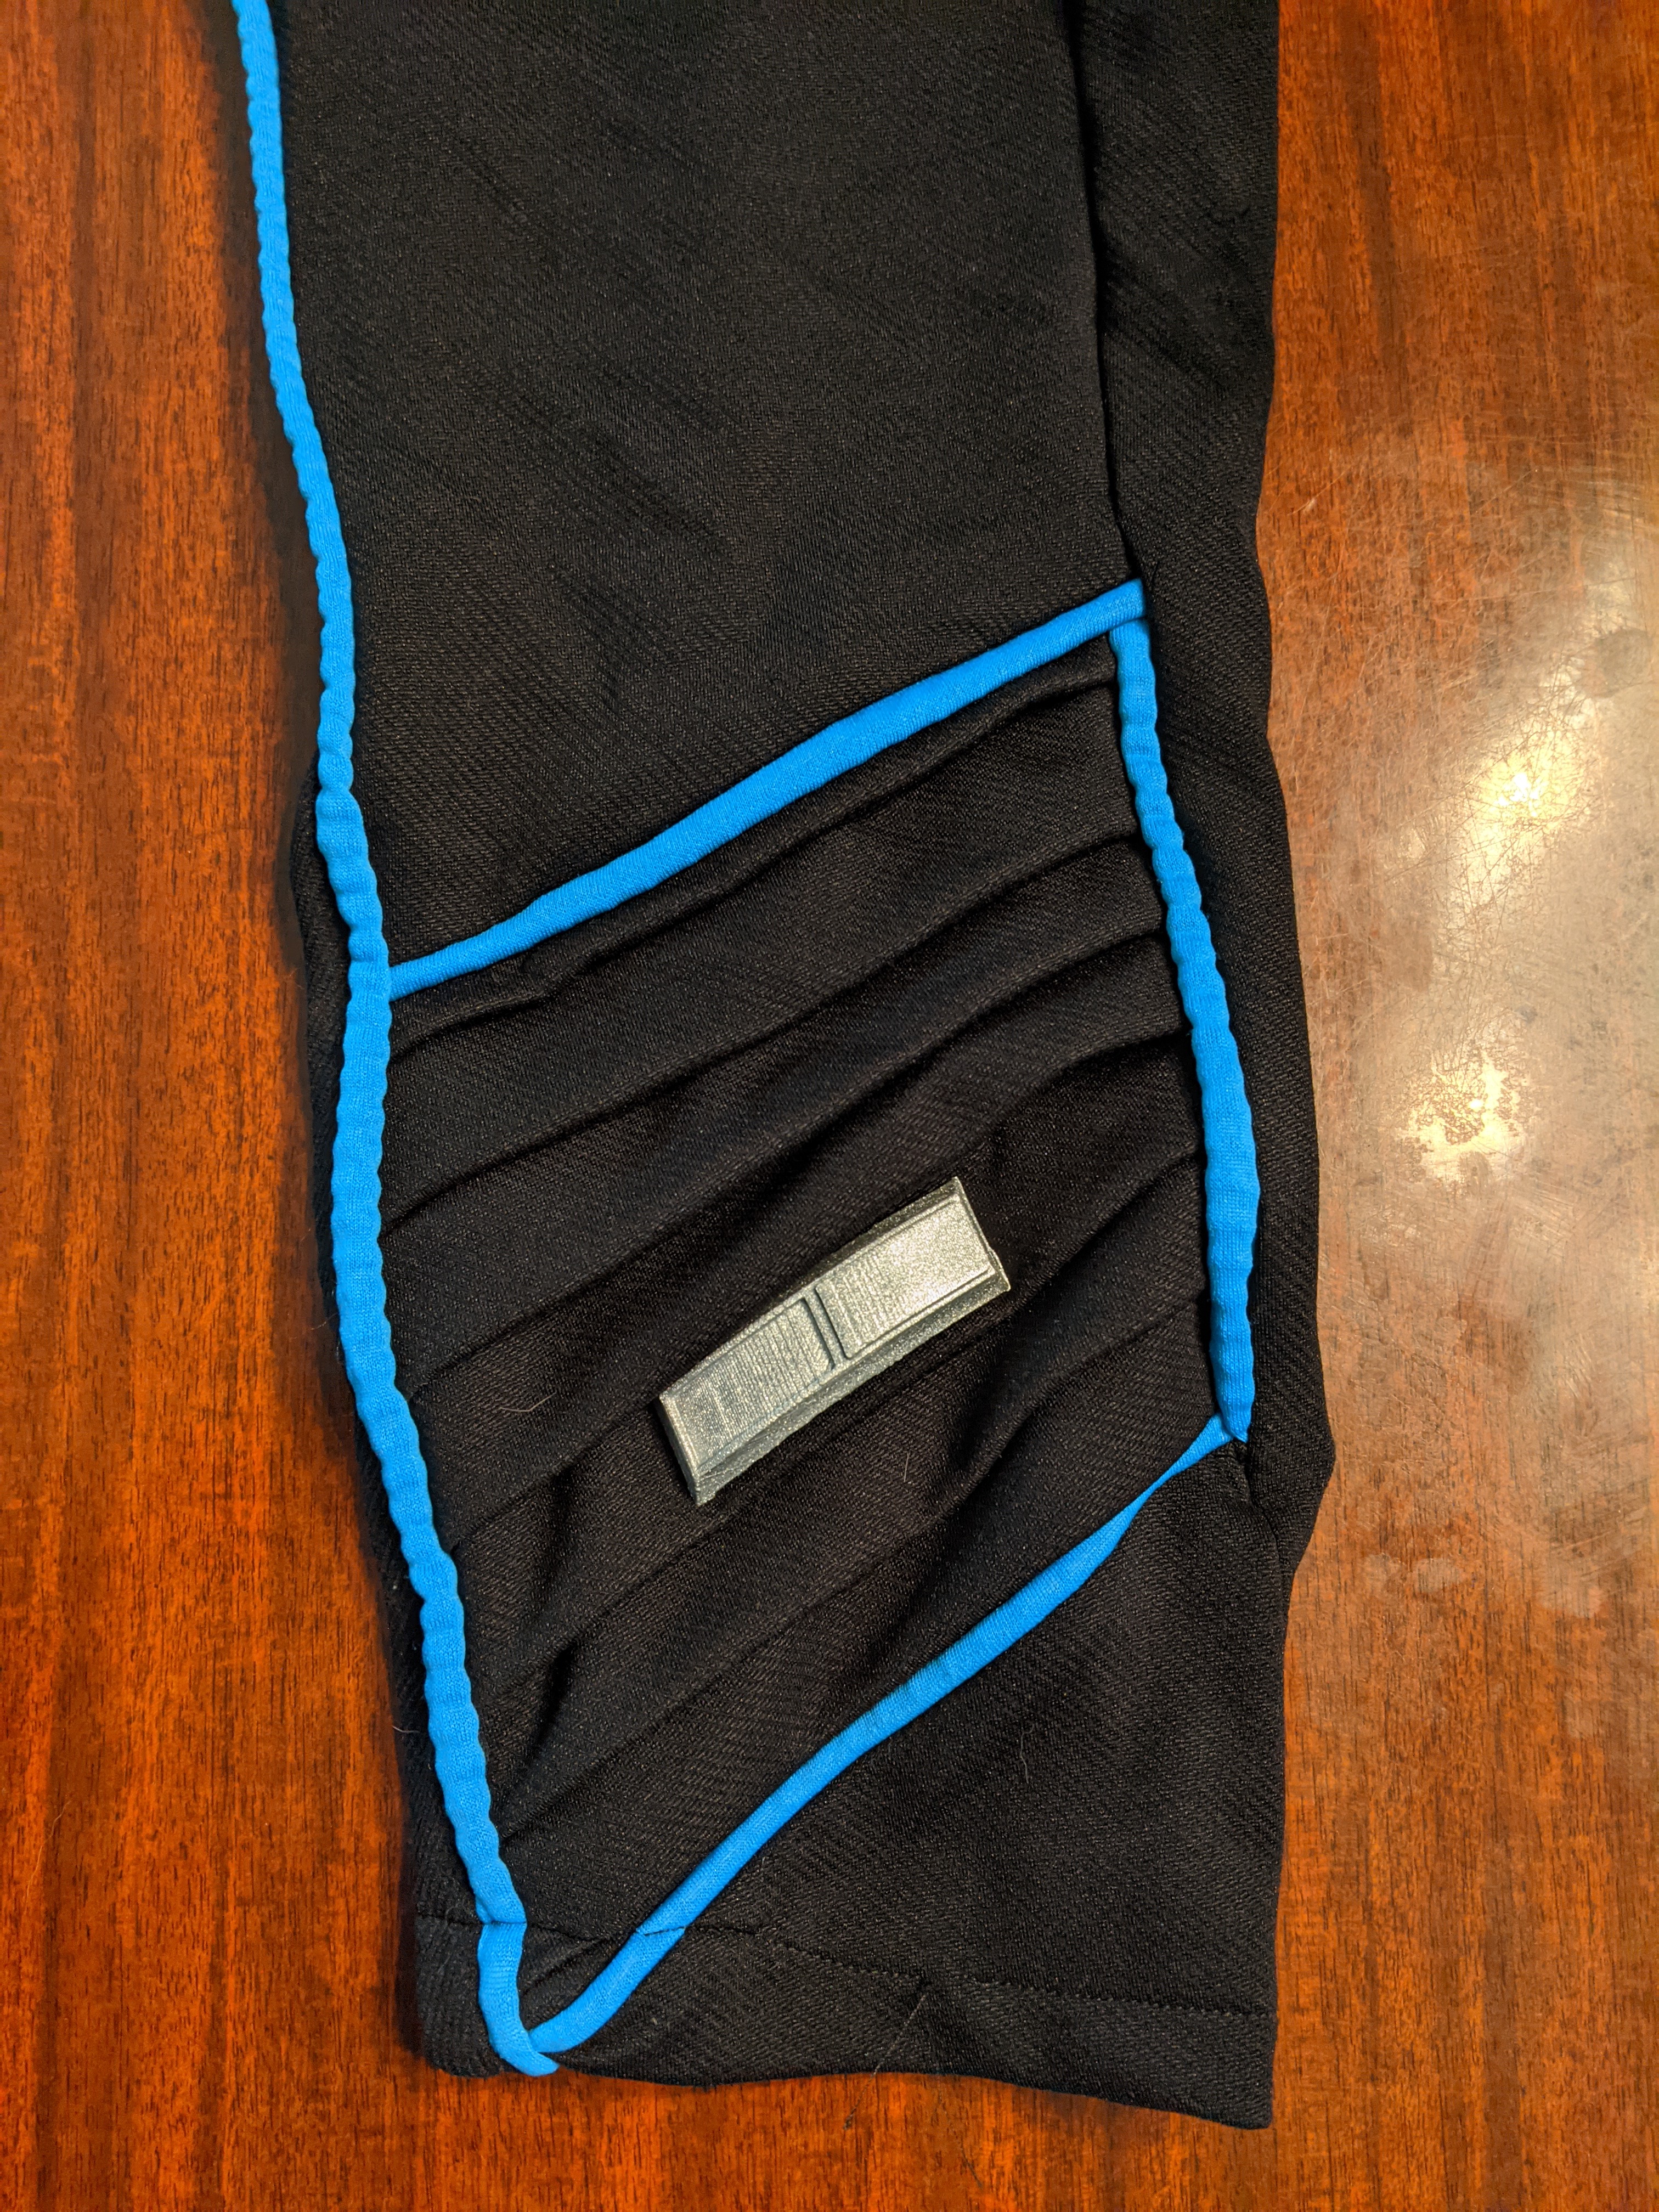
Now I had two reasons – pants and body – to tackle the sleeves. I started by tracing the jacket sleeve pattern. I pinned the sleeve to my arm, and drew a line more or less where I wanted the piping and inset pleated panel to go. I unpinned myself from the pattern, laid it out flat, and redrew neat lines for cutting. To make things easier, I added an extra seam from back shoulder down to the topmost corner of the pleat insert, giving me a vertical seam from shoulder to hem.
I tackled the pleated sleeve panels next. I knew they’d be the hardest thing to make, and I wanted them ready to go when I needed them. Using the same black polyester double knit, I made some experimental pleats. When I made one I liked, I cut a big (I thought it was big enough!) piece of the black double knit, and pleated the entire piece. Because this stuff doesn’t crease I stitched the pleats down vertically every few inches.
Time to pipe. I didn’t know what filler I used in the piping on the pants. The filler I chose for the sleeves is slightly smaller, so the texture of the blue fabric is slightly more visible than on the pants, but that’s Ok. You have to look close to notice they are different.
Next I laid the cut pattern pieces on the black knit and cut them out. Unfortunately, I forgot to add seam allowances. Fortunately, one of the differences between the Kwik-Sew pattern and the Orville uniforms is that the Kwik-Sew sleeves are really full, almost puffy. The Orville sleeves are trim. So what I initially thought was a mistake was actually helpful, by eliminating some of the excess fullness. In fact, I had to take the sleeves in even more in the end!
But first the task of assembling and piping the pieces. Because the first leg of the pants was easy and the second was a nightmare, I decided to do both sleeves at once. I piped the front sleeve, mostly to test how the piping would go. Then I took the final sleeve pattern piece – the pleated inset – and laid it out on my pleated fabric.
It didn’t fit. The odd shape took up more space than I thought. I had to twist and tweak. Did I really want to make another pleated piece? No! So each sleeve has a different number of pleats because that’s the only way it would fit.
Even with the pleats stitched along the edges, it was really hard to sew the pleated fabric in. I ended up stitching the pleated fabric to a solid piece of black double knit.
Finally, both sleeves were assembled. I pinned them into the body. I tried the jacket on. And that’s when I realized the sleeves were still on the puffy side, a little too “sports” and not enough “uniform”. I took the sleeves in on the inside seam, it was the only one without piping!
The collar was next. But, I couldn’t remember the exact shape. So I looked at some photos on the internet and realized I’d made a mistake on the bodice. The actual uniforms had a much larger side contrast panel. The panel was pleated, like the sleeve, and had no side seam but it did have a zippered pocket hidden in a pleat.
Mine did not look like that. It was smaller, had a seam, no pleats in sight. I decided to worry about that later.
I returned to the collar. I traced the Kwick-Sew pattern piece, and recut the tracing to match the uniform collar. I interfaced both inside and outside collar pieces to help the silver knit stand up. I added blue piping and turned the collar inside out.
I pinned it in place right sides together. I stitched it, trimmed the seam allowance, and stitched in the ditch. Next I added the zip. I think mine is longer than the “official” ones. Finally, I turned up the hem on the body and on the sleeves.
The last step was adding the embellishments – the shoulder pad rank insignia, the round department badge, the little thingy on the left sleeve. I could not find this thingy anywhere, and have no clue what it is called. Luckily I was able to find a 3-d printer pattern for it, and my nephew 3-d printed it. Then I spray painted it silver, filled in the hollow backside with temporary stick putty, and pressed in two high powered disc magnets. I used the other half of the magnet to hold the thingy in place on a pleat.
Back to the side pleats. What to do? I made two pleated bands. I opened up the side front and side back seams just enough to slip the bands into the seams, then sewed them down. From a distance, if you don’t look too closely, the look like pleats on the side of the jacket.